ChrisAnn
Junior Forum Member

Posts: 220  Open to constructive criticism of photos: Yes
|
Post by ChrisAnn on Nov 24, 2021 16:59:53 GMT
Yes, that's an idea Michel - I do like things to be tidy so I'll do that, just to get them out of the way. Thanks.
|
|
ChrisAnn
Junior Forum Member
Posts: 220
Open to constructive criticism of photos: Yes
|
Post by ChrisAnn on Nov 24, 2021 16:57:59 GMT
I've just tried to reproduce my problem so that I could prove that it isn't working ... and, of course, everything is working as it should. Sorry to have bothered you, I've no idea what I was doing wrong yesterday (unless the 'Placed' files were 300ppi as suggested and I just didn't notice). Thanks for your advice, I'll make sure I'm not doing something silly again in future.
|
|
ChrisAnn
Junior Forum Member
Posts: 220
Open to constructive criticism of photos: Yes
|
Post by ChrisAnn on Nov 24, 2021 16:39:47 GMT
Both files are 72ppi as they are to go on to a Gardening Club Website.
|
|
ChrisAnn
Junior Forum Member
Posts: 220
Open to constructive criticism of photos: Yes
|
Post by ChrisAnn on Nov 24, 2021 11:06:19 GMT
I use Find>Untagged Items regularly. I did it on my newly installed PSE 2022 and it has also found the mp3 files which come with PSE. I don't want these found each time I do a search for new photos and PSE 2020 didn't find them. I must have changed a setting somewhere but can't now find it. Any ideas please?
|
|
ChrisAnn
Junior Forum Member
Posts: 220
Open to constructive criticism of photos: Yes
|
Post by ChrisAnn on Nov 24, 2021 9:25:40 GMT
I'm starting to work on PSE 2022 and went to do something I've been doing for over two years without coming across this problem.
I have a psd file into which I File>Place a jpeg which has already been cropped to 900px x 675 px 72ppi . In PSE 2020 it came in full size and all I had to do was move it into position. When I do exactly the same in PSE 2022 it comes in to the centre of the psd file but much smaller than actual size. I now not only have to move it into position I have to resize it too by dragging the corners. Not a great deal more effort but as I'm doing this 100 times or so a month every little second saved is worth it to me.
Is there something I should have ticked (or unticked) to keep the inserted photo to its correct size. (The psd file is 1000px x 825px 72ppi which leaves me space for a border all round and text above and beneath the inserted photo.)
|
|
ChrisAnn
Junior Forum Member
Posts: 220
Open to constructive criticism of photos: Yes
|
Post by ChrisAnn on Nov 23, 2021 16:23:15 GMT
I've purchased the one suggested by Moto and it is currently installing itself. It's a bit of a maze trying to get from Amazon to Adobe and then to the right place but with a bit of huffing and puffing I managed it. Just stand by for the inevitable question as to how I can get straight to the Editor or Organiser without having to go through the adobe welcome screen but may be, just may be, I'll find where I saved the solution the last time I went through the process. It's a Christmas present from my husband ... I wonder whether he'll forget about it by the time Christmas actually arrives.   |
|
ChrisAnn
Junior Forum Member
Posts: 220
Open to constructive criticism of photos: Yes
|
Post by ChrisAnn on Nov 23, 2021 10:29:17 GMT
I've had a quick look and it appears to be for the Mac only. Will keep checking to see if the Windows version gets the same discount.
Edit to say that I've now found a Window version PSE2022 PC but am puzzled as it says: Adobe Photoshop Elements 2022|Standard|1 Device| 1 Year|PC/Mac|Disc and the prices are: Standard £54.99 but Upgrade £70.99.
It looks suspicious to me and don't want to risk messing up my PSE or losing it in 12 months time.
|
|
ChrisAnn
Junior Forum Member
Posts: 220
Open to constructive criticism of photos: Yes
|
Post by ChrisAnn on Jul 11, 2021 8:38:08 GMT
OOH! more playing time. Thanks Sepiana.
|
|
ChrisAnn
Junior Forum Member
Posts: 220
Open to constructive criticism of photos: Yes
|
Post by ChrisAnn on Jul 10, 2021 14:55:19 GMT
Wow! hours of fun here. Thanks so much everyone. I know I really need to get to grips with all the options in Elements - no time to get bored even during these strange times.
Edit to say that I've just realised that I can email a link to this thread to myself so that I can always come back and look again when I've forgotten precisely what it was I need to do. Now I must go back and find my other questions and their solutions so that they don't get lost in the mist of time. |
|
ChrisAnn
Junior Forum Member
Posts: 220
Open to constructive criticism of photos: Yes
|
Post by ChrisAnn on Jul 10, 2021 8:17:16 GMT
Thank you for your suggestion Helen - I really need to get to grips with clipping - I do so little 'playing' with my photos that I forget what I knew.
Sepiana you've hit the nail on the head - I was using the wrong tool. I knew it would be something basic that I'd got wrong. Now all I need to do is remember this fact for future reference.
Now I can do it I'm not so sure I like it - so I'm going to have another 'play' to find just what I'm looking for. It's to go on the cover of an A5 magazine I edit. The front cover always has a photo of a cliff in Dorset called Golden Cap. As you can imagine, there's not much you can do to make the same subject 'different' so I thought I'd have a go at a variety of crops. I'm not sure that this is the right one but at least I can now get on with finding one.
Thank you both.
|
|
ChrisAnn
Junior Forum Member
Posts: 220
Open to constructive criticism of photos: Yes
|
Post by ChrisAnn on Jul 8, 2021 16:42:27 GMT
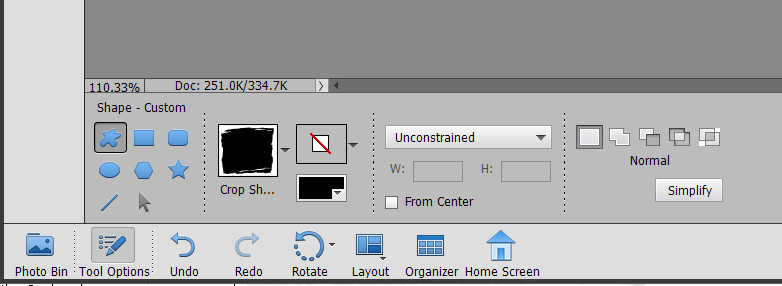
I have a photo I wish to crop with a shape from the shape tool. I've chosen the shape and dragged it over my photo as it says in the help page ![]() but instead of it cropping ie cutting stuff out, it blanks out the shape from the original photo leaving visible the edges I want to remove.
Original picture
Blanking it out rather than cropping
These are my settings for the Shape Tool
Am I using the shape tool incorrectly? If it is working as it should what is it used for?
|
|
ChrisAnn
Junior Forum Member
Posts: 220
Open to constructive criticism of photos: Yes
|
Post by ChrisAnn on May 6, 2021 17:38:53 GMT
Wow! Thank you Fotofrank and Sepiana - that's just what I wanted. I've battled for ages trying to work out what to do until it suddenly occurred to me that I had a source of help and advice on here. Now I'm off to have a proper 'play' Thanks again. |
|
ChrisAnn
Junior Forum Member
Posts: 220
Open to constructive criticism of photos: Yes
|
Post by ChrisAnn on May 5, 2021 9:18:36 GMT
Years ago someone made me a lovely Action so that I could automatically increase the depth of a photo giving me room to type in a title or short explanation. I use it every time I show people my holiday photos (not last year for obvious reasons!).
I would love to have a similar 1 or 2 click action which puts a 3 px (or so) frame around all the photos I have open in Editor. Nothing fancy just a thinish black line. They will be different sized pictures (landscape or portrait or square) depending on how I've cropped them.
I can see the frame styles but can't find one which is just a boring black (or other colour) line and even if I do find one it will mean me having to do it to each photo individually. Is there such an action?
|
|
ChrisAnn
Junior Forum Member
Posts: 220
Open to constructive criticism of photos: Yes
|
Post by ChrisAnn on Apr 23, 2021 7:10:28 GMT
I am going to make a wild guess that you have acquired a glitch in Windows that is causing this behavior; and, if so, about the only cure would be a clean install. One way to check = perform the work on a few images using a different program not within Elements or the Organizer and see if the problem remains. Thanks for the suggestion BuckSkin. That certainly makes sense and I'll have a try. I was beginning to think that it was my memory playing tricks and it has never worked the way I remembered it. |
|
ChrisAnn
Junior Forum Member
Posts: 220
Open to constructive criticism of photos: Yes
|
Post by ChrisAnn on Apr 14, 2021 12:13:11 GMT
I'm still working on external hard drive photos and realise that when I'm saving the altered pictures they aren't overwriting but saving them in another part of the drive ie making a second copy despite me clicking on the replace original option. I'm now having to go back over everything I've done, manually move the file into the correct folder and remove the original version.
|
|